I put this tutorial together for
Sew Sisters for their Kona Club Challenge. last month. There are some great projects for other Kona solids projects on the Sew Sisters blog and this tutorial is also found there.
And Sew Sisters has an awesome
deal of the month for November, Kona Basics, Ash, Black, Charcoal, White and Snow are only $7.69 a metre. Just saying.
I decided to make something a little different for this project. It would make a great gift for someone else but it might also be something you might like to make for yourself!
Supplies:
- 4 FQs of Kona Solids ( I used Cornflower, Daffodil, Grapemist, and Windsor)
- 1 FQ of Kona Solids OPTIONAL (this is for the lining and I used Kona Snow)
- Scrap piece of batting measuring 14" by 23" at least
- 1-3 ring binder 1" (I used an inexpensive Hilroy binder measuring 11.75" by 21.5" when open and lying flat. The spine measured 1.5")
All seams are 1/4"
Cutting Instructions:
Decide which Kona FQ will be your feature colour for the outside binder cover and cut
2-8 x 13.5"main cover
From the 3 remaining FQs cut
2-8 x 13.5" inside flaps
2-8 x 13.5" inside flap lining
2-6.75" x 8" inside flap pockets
10-2" x 8" spine pieces assorted colours
2-2.5" x 8" inside pocket top edge from a colour which contrasts from the pocket

Sewing Instructions:
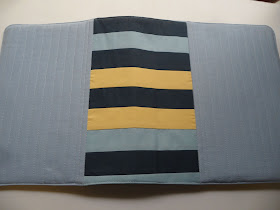
Arrange the pieces for the binder spine in a pleasing order and stitch together. Press the seams to one side. Centre the spine section to the front cover pieces and stitch as shown in the photo. Trim the top edge of the spine section. Place the outside binder cover on your batting, baste as desired and quilt as desired. I like straight lines and lots of them!
Press down 1/4" the long side of the pocket top edge. Stitch pocket top edge to pocket. Press seam towards pocket top edge.
Press pocket top edge towards the pocket, covering the seam. Top stitch close to the edge, encasing the seam. Repeat for second pocket.
Layer your flap pieces in this order. Inside flap, pocket, inside flap lining and finally batting scrap measuring 8" x 13.5".
Stitch flap to flap lining, making sure you have inside flaps which are mirror images of each other as in the picture below. Trim batting from seam allowances, press and top stitch edge. Nice!
Stitch flaps to main binder cover. Again, trim excess batting from seam allowance and press. At this point test the fit of your binder in your cover.
You want there to be some looseness as the top stitching at the end will also reduce the amount of wiggle room. Trim your binder cover to measure 12.5".
With right sides together, stitch top and bottom edge of flaps to outside binder cover. Trim batting from seam allowance. Trace the rounded corners of the binder on all 4 corners and stitch a curved corners. Trim seams and turn to right side. Press carefully. At this point, you may wish to place lining on the inside of the binder cover. Slip stitch to top and bottom inside binder encasing upper and lower bottom edge. This is completely optional. Otherwise, press spine of binder top and bottom edge to the inside. Top stitch carefully around the entire outside of the binder cover. I added a second row of stitching to secure the seam at spine edges.
And there it is! A lovely covered binder to store all your patterns and notes in and some lovely leftover scraps too!


No comments:
Post a Comment