Tuesday, September 30, 2014

Zippered covered journals... A tutorial-ish


Let me just say that these are a bit crazy making but with a stitch ripper and a bit of time, you can be most successful!  I called it a tutorial-ish because your journal may be a different size than mine.  

You need a hardback journal to cover.  Not too big and not too small.  This one is 8.25" by 6".  The size of your journal is really important because you need a long enough zipper to go all the way around.  In this case, I used the longest dress zipper I could find at 22" or 55 cm if you are Canadian like me.  If you have a larger journal, you can buy a duvet zipper and trim it to length.  Duvet zippers are a lighter weight so it is a bit of a trade off.  In my technicolour dream world, I would have liked metal zippers but fine enough gauge and long enough was impossible to find.  Boo hiss. So here we go.


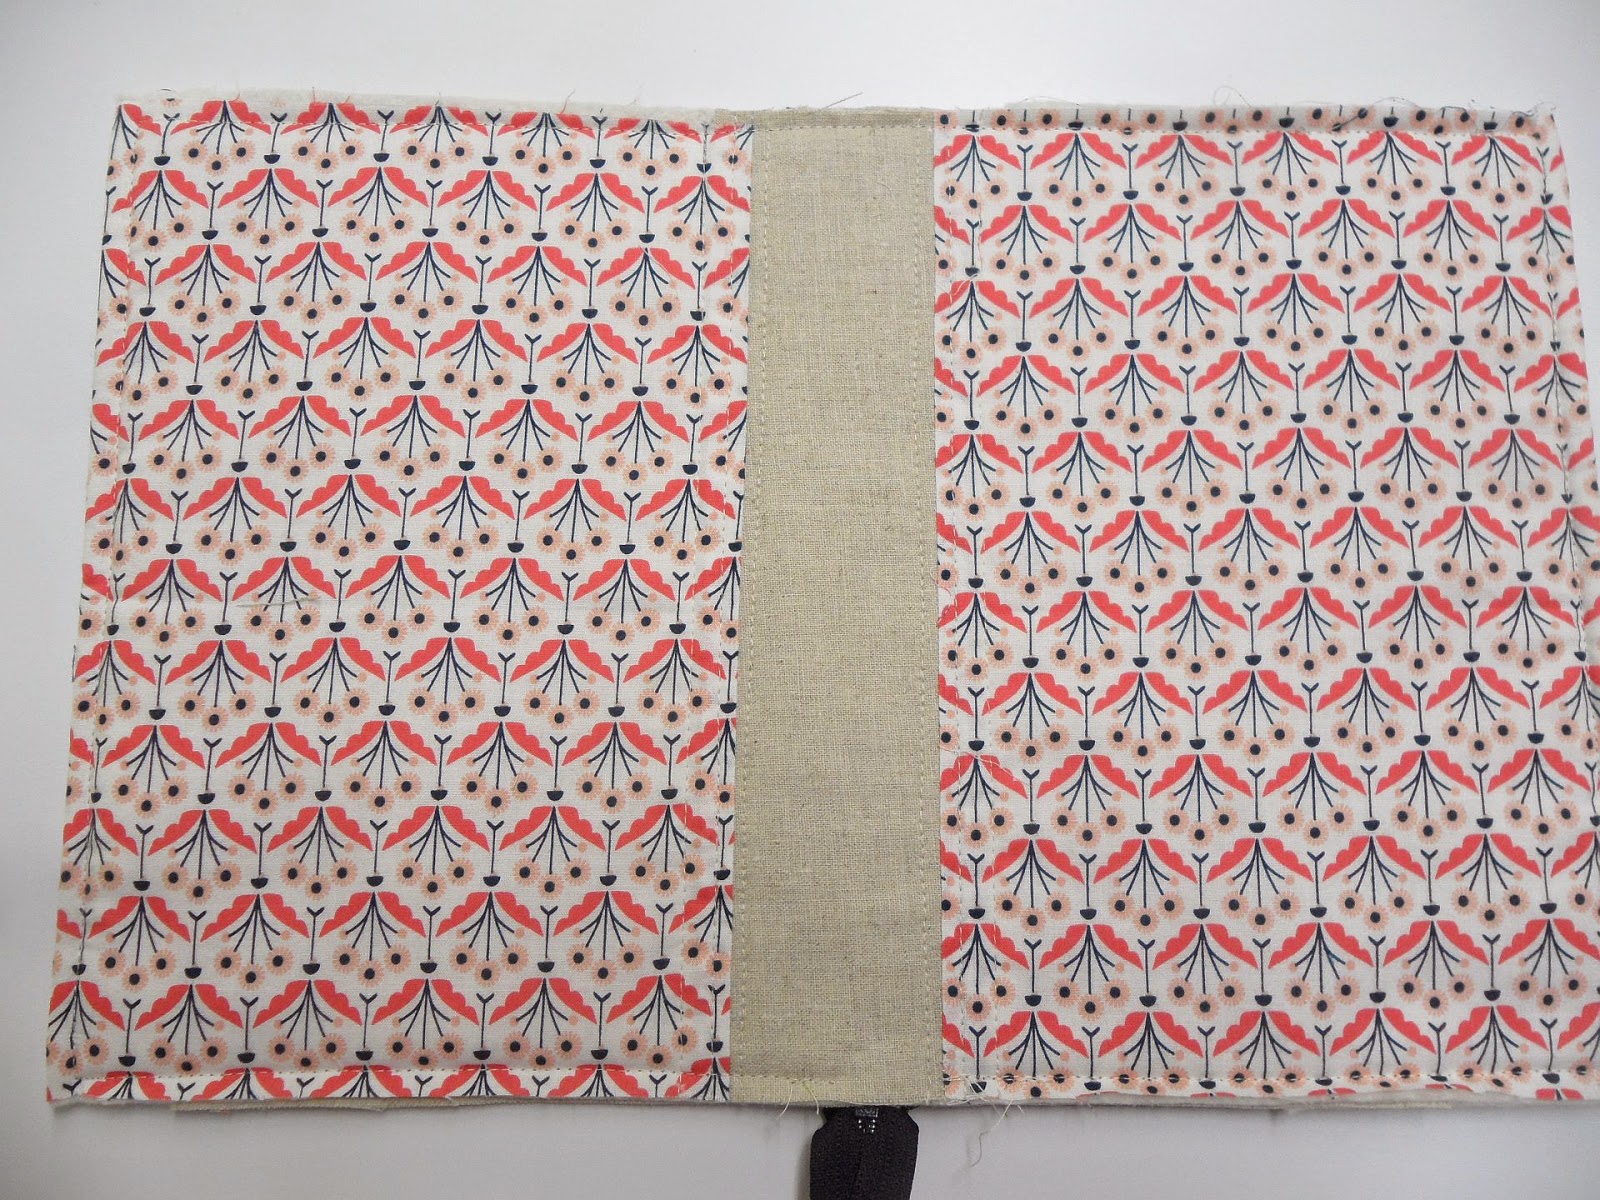
You need fabric, a zip, batting and a journal.  I used a bit of linen for the spine since I wanted to really show off Elizabeth Olwen's Wildwood fabric, I did not do any piecing other than the spine.

Measure the entire width of your journal when open and add 10".  Keep that in mind as you construct your cover.
1)  linen strip measures 3.5" by 10".
2) feature fabric 2-10" by 9.75"
3) batting approx 11" by 22"
4) inner lining, optional but makes a neat finish, 1 -10" by 11" .  I used linen.

Piece linen and the front and back panels of your feature fabric.  Place over batting and quilt as desired.  I kept the quilting minimal, with a row on either side of the spine as you can see below.


Test drive your cover on your journal and mark where you flaps will fold under.  Make sure they are even.  Narrow hem the flap ends.  Trim your cover so that you have a 1/2" of slack top and bottom. Remember that you are sewing on binding but you need to have enough slack to get the journal in and not be too tight.


Place lining on the inside of your cover, fold flaps over.  The lining does not need to be as wide as your cover but close.  Measure the centre of your cover top and bottom and mark as I have with pins.  This is very, very important as it dictates the placement of your zipper.  If you are off, then your cover will be super wonky.


Place your opened zipper at the pin marking the bottom edge of your cover.  Notice the placement of the zipper tab.  It is facing up.  This is very important.  Leave the zipper end dangling as shown in the photo.


Start stitching from as close as you can get to the zipper tab, a scant 1/4" from the edge. I used my quarter inch walking foot.  Snazzy.  I never use a zipper foot and I did not pin the zipper.  Be brave.  You can do it.


When you get to the corner, stop 1/4" from the corner and pivot your pressure foot.  At the same time, turn the zipper so it is now around the corner.  Resume stitching, making sure you do not catch any zipper teeth.  Do not worry if the zipper tap scrunches up around the corner, this will be covered by your binding.  So clever.


Continue around the next corner and overlap the zipper ends as you can see in this picture.  So tricky.  Keep going until you stitch all the way around.  Again, get as close as you can to the zipper tab but it is acceptable to have a little bit unstitched.  This will get taken care of.


 You now have something that looks like this.  Try your zipper out and see how clever you are.


I made a lot of them.


Now you need some binding.  I used 2.25" double fold binding.  And I might add that I was doing this while my husband was renovating my sewing room.


 Attach binding, starting half way down one side.  You will need to start and stop stitching at the zipper tab.  You will finish this bit by hand.  Sigh.


And all you need to do now is hand sew your binding down for a nice finish.  Finish the zipper tab end by hand as well, tucking the zipper end in to the spine of your cover.  Give it a little bit of slack and tack down the zipper tab end.  Test drive your zipper before you tack it down so you can ease the fit.  There you go.  You are done.  Try it out.


Monday, September 29, 2014

Elizabeth Olwen's Wildwood for Cloud 9 Fabrics: Warp and Weft Sewing Society Blog Hop Covered Journals

6a016300f919ba970d01b7c6e7ccc6970b-500wi

I had an opportunity to join in another Warp and Weft Sewing Society Blog Hop.  How could I not jump in?  We got to play with some beautiful and newly released fabric designed by the ever so talented Elizabeth Olwen who designs fabric for Cloud 9 fabrics.  Elizabeth had created a look book for us and I volunteered to make covered journals and why not make it even more interesting and add a zipper?  Stay with me people because tomorrow, I will give you a little tutorial about how I did it.

Warp and Weft is hosting “Warp and Weft Weekends” and the first one features Elizabeth Olwen and her new collection for Cloud 9 fabrics called Wildwood. This past weekend in Toronto, Elizabeth gave a talk and trunk show, and her fabrics were featured in an afternoon tea and workshop with Sherri of Thread Riding Hood to make a sweet satchel! 

I could not be there, but the covered journals I made were.  Have a look... this is the gorgeous fabric that I got to play with.  (and a little bit of linen) This is really lovely fabric.  It has a beautiful hand and the prints are just gorgeous.  Elizabeth was inspired by walks in the forest and looking at the forest floor for rare flowers and interesting leaves with a little bit of fairy tale for good measure.  And of course you might need a journal to record those walks.


And I made four covered and zippered journals.  Because some are better than one.


Please have a look at the other beautiful creations that have already happened and those to come.  Tomorrow is Esmari!

Tuesday, September 23, 2014

Liberty and Linen


My kids treated me to some Liberty from Purl Soho for my birthday.  Our daughter wanted me to come up with something quilty that I would feel far too guilty to buy myself.  No brainer.  How about some Liberty?  So I picked out this rainbow bundle of 20 fat 1/8ths.  Fabulous!  Then our son had me pick out some more.  Why not?  I picked out a fat quarter bundle and a scrap pack.  I feel very spoiled.  Very spoiled.


Mum was off to Europe recently and brought me back some linen from Estonia.  Have a look!


Other than that I have finished all the blocks for this one but I haven't taken a picture because my sewing room is in the middle of being painted!  EEEK!

Busy at work starting up the school year in full force.  It is a good busy though.  Really good busy!

Friday, September 19, 2014

Fabric enabler warning...


My buddy Cynthia designs fabric for Robert Kaufman.  This is her new line called Sewing Studio.  I just love it.  I ordered it from Hawthorne Threads and I am sure we will see it popping up at other online shops.  It is awesome.  Cynthia is just super with text and I love the sewing machines.  Check it out.  Lindsay from Hawthorne Threads has added some of the line to her Lindsay's picks.  Just saying.  She has taste!


More fabric news.  Sew Sisters, a sponsor of mine, is having a Kona sale.  Oh yes they are.  Starting September 24 to 30.  $6.99 a metre. Sew Sisters also has lots of new great stuff in their clearance section.  Check it out.  You will thank me.  Happy Shopping!


Monday, September 15, 2014

What do you think?


Last Thursday evening, the Fraser Valley Modern Quilt Guild celebrated our fourth year anniversary.  We had a heck of a good time.  We had a mini iron quilter competition with teams of quilters producing an 18" by 18" mini quilt on featherweight in an hour.  That is the bedazzled iron quilter trophy made the fabulous Cynthia.  It is a thing of beauty!  of course as we were sewing, the evil doers,  the organizers, threw us curveballs, like now you have to add in some ugly fabric, now you have to quilt it and finally, bind it!  I have to say that my team won!

And here we are...  that is me on the left with Marg, Colleen and Charlene.


I was just a little bit excited!  That is all featherweight, quick and dirty quilting by the way!  We had to have at least 20 pieces of fabric in our mini.  


 The quilt guild got together to make thank you quilts for Cynthia and Lysa who founded the guild four years ago after they had a bright idea.  It was a super bright idea.  We are a fantastic bunch of happy, creative women who absolutely love getting together to talk quilting, fabric and fun.  It is such a positive and supportive group.  I am so tickled to be a part of it all!  Anyway, I digress.  We decided to make Cynthia and Lysa quilts to say thank you.  And we were super sneaky and pulled it off without them knowing a thing!  We even had a super secret sew in.  Then Bonnie and I quilted them and I got to present them at the meeting.  They were suprised!  Aren't they lovely?  The quilts are too!


Darlene says this is the money shot.  That's me giving our Lysa a big hug.


You rock, ladies!


Wednesday, September 10, 2014

I made this the other day...


I made this the other day.  I made it to try out a theory.  I am pleased to say that it worked.  Can you see it?  Yep.  It is a zippered covered journal.  Squeal!  This, for some reason, gives me great joy.  I will say that the zipper I used is not a favourite.  I had a vision of a fantastic metal zipper but do you know how hard it is to find a long metal zipper that does not look like it is made for a logger's winter coat?  I think, however, that I have solved this problem and I will be trying out more versions of zippered covered journals very soon.


Oh my goodness!  Look at that zipper!  So awesome!  I used a duvet zipper and just cut it to the right length.  I wanted to show you that the journal does open all the way too!  Success!


Linking up with Amanda Jean for Finish it Up Friday.

Tuesday, September 9, 2014

Progress...


I continue to make progress on my scrap buster number two which is a block from the book Modern Bee:  13 Quilts to Make With Friends.  Surprisingly, I am still using white from my scrap whites.  I am trying to use all those leftover setting triangles and bits and pieces from other projects and so far it is working.  I am working my way through my other scraps but found that I just too darn short in the orange department so have resorted to some orange fat quarters that have been lingering in the stash to make up for the scrap shortage.  These blocks all need trimming but it is very satisfying to take these oddly shaped bits of fabric and slice them into something pretty.


 I plotted out the size of the quilt on my design wall so you can see that the blocks that extend out into space are marking how big the quilt will be.  I just need to fill it all in.  And as a matter of fact, I have already filled in a lot more since I took this picture.  Notice the squash all lined up under my design wall.  I don't know why they are there but Husband decided they should live there when he brought them in from the garden.  They are a beautiful colour!  While I was making these blocks on the weekend.  Husband was busy with the renovation on the sink wall of my sewing room.  I am quite excited about that as we had left that side of the room until now. Stay tuned!  Linking up with Lee at Freshly Pieced for Work in Progress Wednesday!


Sunday, September 7, 2014

Bee Blocks: Pineapple Blossom


I took care of my bee blocks right away today.  They were blowing a bit on the barn wall.  This is Pineapple Blossom and is a free block pattern at Quiltville.  The block pattern is available in two sizes and Michonne asked for the biggie size.  So fun!  The block tutorial gives a little hint for using up the corners that you cut away so I did that and I have a small stack of completed hsts as a result.  This block is a super great stash buster as the bigger size uses 2.5" strips.  

And here is an example of Toni's finished quilt using the same block.  It is gorgeous!

There you have it.  Bee Blocks for That Stash Bee September.  Check.

Thursday, September 4, 2014

Fall is coming


First of all.  Sunflowers.  What a fabulous thing.  Husband always plants sunflowers.  We have them grow along the wood shed and they feed all sorts of chickadees and other critters.  This year the seeds did not exactly work as promised as we usually plant Giant Russians and that is what the seed packet promised but this year we got giant sunflowers but branching ones without the giant flowers.  But man,  they are tall.  This one is over 11 feet.  Seriously.

Let's talk about fabric.  I have been crushing on the latest Eclectic Elements  by Tim Holtz and when my quilt guild buddy, Cathy, who owns Steam Trunk Craft Works, spread the word that she had them in stock, I was on it.  The fabric arrived super fast and was all wrapped up and lovely with the sweet little charm added.  So fun! Love the clock faces.  Fabric happy!