Tuesday, November 26, 2013

What is up this week?


On Saturday, I spent the day sewing with the fabulous ladies from The Fraser Valley Modern Quilt Guild.  I shared the instructions with them for the Wonky Star table runner and lots of them were busy making them.  I joined in the fun and made this one, all in blues.  It is going to be a gift.  It was fun to use a bunch of Christmas fabrics that may not have been used any time soon!  And I have to say that it turned out quite nicely!  The runner is all quilted and bond and ready for a photo opportunity.

I also worked on some star blocks for a baby quilt.  That was fun!


And what were other people up to?  Laura and Vera were doing surgery on a sewing machine foot.  They were successful!


 Barb was getting busy with a fabric bowl.  How cool is that?


Lysa was making Christmas stockings and was consulting with Cynthia on trim placement.  I have to say that the stockings were gorgeous!

Lots of Christmas makes underway!  Linking up with Lee at Freshly Pieced for Work in Progress Wednesday and with the Needle and Thread Network.

Sunday, November 24, 2013

Wonky Wonky Little Star Table Runner Tutorial


Wonky Wonky
Little Star Table Runner


Materials:


Background
fabric:  approx. 1/3 of yard cut into
32-4” squares (feel free to use low volume, scrappy white… as long as you have
32 4” squares)


Star
fabric:  Assorted Christmas prints…. This
is just a guide based on the sample.
Feel free to use more prints for more variety.  A full star will require 5-4” squares. This
is a great way to use up Christmas fabric scraps.


Scrap
Management Tip:  I keep all my Christmas
scraps in one bin. Makes them so much easier to find.

Print A:  10-4” squares
Print B:  9-4” squares
Print C:  9-4” squares
Print D:  6-4” squares
Print E:  6-4” squares

Batting and
Backing:  16” by 40”  (feel free to piece your back and the Batting
will be used as your design wall for this project as well as your batting)

Binding
fabric:  about ¼ yard (approx.. 120” of
binding at 2.5” ) You can always make it scrappy.

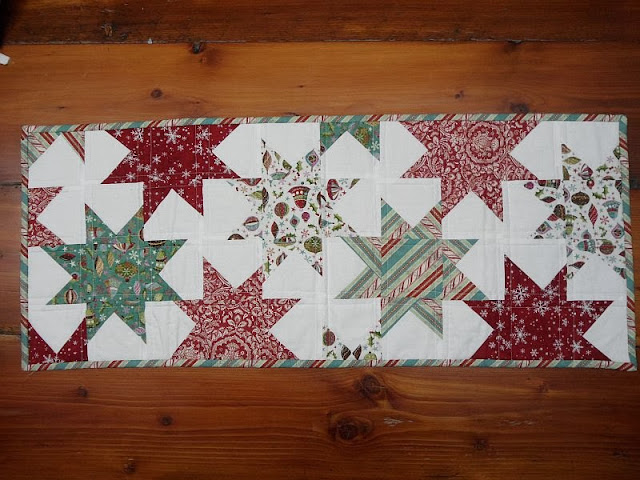
Please read the instructions all the way through just to make sure you know what you are up to!  You do not sew any of your squares together until your entire table runner is laid out and you are happy with the colour placement.  

Hint!  Use the picture of the completed table runner to help you with your layout.

Wonky Scrappy Little Star Tutorial... because this is just so much
fun!


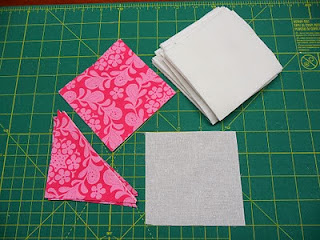
Step One:  Wonky Star preparation

Cut your scraps into 4”squares.  

Cut your background fabric into 4” squares as well. 

For every star you will need  5 of the print squares. 
Leave one square whole and cut 4 of the matching squares on the diagonal
yielding 8 triangles.


Step 2:  Wonky Star construction

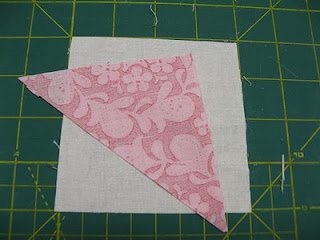
Take one background square and place one triangle in the most
wonky way possible as in the above photos.  My wonky may be different from
your wonky and that is just fine.  Let your inner wonky shine!


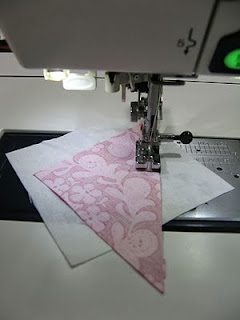
Stitch with a quarter inch seam.  You can do it!!

Trim your little leftover corner.  I use scissors because I "trim as I go" right at the
machine. 

Finger press the wonky little star point.  


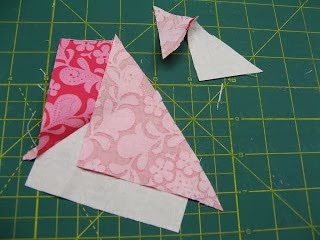
Then place your next point in true wonky fashion.  Then
stitch. 

Trim the corners here as well.  Make all 4 of your wonky star
points in the same manner but let each be their own wonky individual
self.  The point is that the points do not have to be matching. 


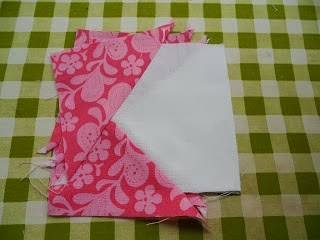
Time to press!  I press the first one and then pile the next
on top, lining up the corners and pressing in a pile until I have all four of
the points in a neat and tidy pressed pile.  You might like to be more
quilt professional and less quilt lazy but I like to get this part done as
quickly as possible. 


*Take your neat and tidy, pressed pile to the cutting mat and trim
all 4 of the point blocks into perfect 4” squares again.  Discard your
trimmings. 


Step 3:  Take your four star
point squares and your matching print square and place your newly completed
wonky star into the mix.  Note how the stars are all imbedded or
nested? 

Hint:  This is one project where you need to build your project as you go.
It is best to start in the middle of the design wall and build outwards.
You will notice as you build the  layout that you also get a cool little
pinwheel thing happening between the stars with your background fabric.
How excellent!

*You will fill in the spots with the leftover star points to
complete the 4 by 10 layout as in the picture above. 


*Once you are happy with the layout and have checked for colour
placement and proximity, start sewing your squares together by rows.

*Once all the rows are completed, then sew the rows
together.  Pin at each seam so your seams match up carefully.  Again,
always check to makes sure your stars are lined up nicely. 
Sandwich, quilt, bind and enjoy

 Options:  You can make your squares different sizes.
I made both a pillow and runner with 2.5" squares.  And a quilt with 4” squares.


Saturday, November 23, 2013

Wonky Scrappy Little Star Table Runner


I am off to a full day of sewing with my peeps from the Fraser Valley Modern Quilt Guild.  Seriously fabulous!  And I will be sharing how to make this table runner for anyone who is so inclined,  I made it from Christmas scraps, mostly Basic Grey scraps in fact.  Don't you just love how the pin wheel appears between the stars?  Love that!

This runner is about 15" by 38" and is quilted with Aurifil 50 weight in white. The binding is a fabulous striped print from the same Basic Grey line as the scraps. I think the line was called Fruitcake.  I love the slightly non-traditional colours.

Anyway, I will write up the tutorial and get it up on the blog this weekend!  Happy sewing!  Linking up with Amanda Jean for finish it up Friday!

Tuesday, November 19, 2013

Work in Progress Wednesday: Bee Blocks for Toni


It is November in That Stash Bee and that means Toni gets to call the shots.  Toni asked for a 15" crown of thorns block.  And she had some lovely inspiration for the colours so I got busy on Sunday and made 2 of them.  They are already winging their way to the US as we speak.

And with these blocks finished, that means we have completed an entire year in the bee and it was really delightful!  Thanks to Toni, we are ready to roll for round 2 in January.

Other than bee blocks, I checked my Modern Scrappy Bits quilt as you go project off the list and it too, is in the mail but for the first time ever, I forgot pictures!  Argh!

I am off on a conference for a few days but will be back in time to spend Saturday at a sew in with the Fraser Valley Modern Quilt Guild!  So much fun!  Darlene brings great coffee and we have three possible make and takes ready to roll for those who are so inclined.  My Wonky Star table runner is one of the three so I have been busy writing up the instructions.  I will post that next week!  Here is an in progress shot of the table runner just for fun.


I also started some Christmas makes but those will have to wait for show and tell!

Have a wonderful Wednesday!  Linking up with the Needle and Thread Network and Lee at Freshly Pieced for work in progress Wednesday..

Monday, November 18, 2013

And what I made..


And this is what I made for swapping with  Cynthia.  I used lots of Anna Maria Horner scraps along with some other saturated scraps-Negley, Fassett and the like.  I think some of my infamous turnip fabric even wound up in there.  Sure it did, right on the bottom right.  I used some scraps of linen to frame it all in and lots of straight line quilting in a really lovely gold beige Aurifil 40 wt.  Perfect with the linen!  Measuring about 16" by 22", I think it is a nice table mat size.  The binding is a remnant that my daughter picked up for me in Oregon.

Done and delivered at guild last week along with scraps a some rope.  Yep.  Rope.  Cynthia makes simply awesome fabric baskets with the rope and I decided that it was better being used at her house than sitting in a bin at my house.

Have a super rest of your day!


Sunday, November 17, 2013

Swap-tastic!


Well. I have some pretty awesome quilt guild buddies at the Fraser Valley Modern Quilt Guild and Cynthia is definitely one of them.  Cynthia is a fabric designer for Robert Kaufman and is also the creative genius and publisher of Made In Magazine.  Cynthia and I decided to do a little private scrappy swap.  We each made a table mat and we super sized the scraps to a yard plus.  Cynthia made the awesome hexi mat for me and she has a tutorial on her blog for a mini version if you want to check it out.


Awesome Cynthia made label!

And then the scrap goodness!  Cynthia made sure to add several bits of her own fabric designs including this stitching one which is apparently found at Jo-Anns as we speak.


Eep!  Heather Ross mermaids!!!!!!!


And some of Cynthia's Retro Christmas line which is available now!  I love it!!!!!!
Swapping is so much fun!  It is so much fun that I mailed my Modern Scrappy Bits Swap Round 5 package today without taking any pictures!!!!  How can this be!!!!

Anyway... thanks Cynthia for swapping with me.  I have already used some of your scraps!


Friday, November 15, 2013

Quilt mail... the very best kind!


Yesterday my husband teased me while I was still at work that I had quilt mail.  The very best kind!  Two squishy packages were waiting for me and he wouldn't even tell me who they were from.  He told me I had to wait until I got home!  So what did I find?  My Simple and Sweet Scrappy swap package from Anne-Marie!  Seriously drool worthy!!!!  Check it out!  Look at all those lovely Liberty prints she pieced into the needle book!  Total swoon!  And great fat 1/8s too!  Thank you so much, Anne-Marie!


And then I opened the other package.  Awhile ago I won a a giveaway on Kristel's blog.  Seriously spoiled again!!!!!


An adorable fabric basket and pin cushion loaded up with lots of Liberty again!!!!!  So awesome!  and then she made this darling tree garland bedecked with more Liberty!  OH MY GOODNESS!!!!!  Love it!  So thank you so much,  Kristel. Quilt mail.  Gotta love it!


Thursday, November 14, 2013

Marcelle Medallion... a finish


 Name:  Marcelle Medallion
Design: From Liberty Love
Size:  approx  62" by 62"
Fabric:  lots of fabric from the stash
Backing:  Ikea Britten Numbers and Feedsack prints
Binding:  red tone on tone print
Quilted: by me with Aurifil 50 wt in white


I finished it!  Let me introduce my version of the Marcelle Medallion from the book Liberty Love by Alexia Abegg. This was a lot of fun even if there were a lot of little pieces.  I used a lot of scraps and  some DS prints, some Flea Market Fancy, some Feedsack prints, some vintage prints from my Gramma and a whole bunch of low volume bits and pieces.  I had the idea to use retro 1950s colours as I was thinking or arborite tables and kitchen colours from the 50s.  Like these pictures from a 1950s copy of Better Homes and Gardens...


I quilted this fairly densely, using a variety of free motion things in Aurifil 50 wt in white..  Can you see the little tiny fans, next to the flying geese blocks on the left?  I also did some straight line quilting on the outer borders.  This was the first time that I did so many different things with the quilting.  It is far from perfect but it was fun to try something different!  I also addes some extra inches to the final border to make the quilt just a little bigger.


 I used some of the Ikea Britten Numbers on the back!


Linking up with Amanda Jean for Finish it Up Friday!  Yay!

Tuesday, November 12, 2013

Working on stuff...


This past weekend was a fun one with the kids at home for at least part of it!  I still managed some sewing including hemming some new nurse pants for daughter and making a "commissioned" stethoscope bag for... nurse daughter's special someone's soon to be nurse sister.  Does that make sense?  Giggle.  That is for you, Grant!

This is the finished stethoscope bag, finishing at 6" by 15".  She likes butterflies, so butterflies she gets.


I also started and finished the Wonky Wonky Little Star table runner.  More on that later but let me just say that it may have something to do with our quilt guild.   I just love stars and embedding the wonky stars like this just makes me happy!  I have a tutorial that I did up a long time ago when I made a quilt with nested wonky stars.  And here is the finished quilt...

I also got started on a my swap package for the Modern Scrappy Bits Swap round 4?  I think it is round 4... maybe 5!  And I finished my Marcelle Medallion quilt!!!! Wahoo!  So many things to talk about and so much progress!

Linking up with the Needle and Thread Network and Lee at Freshly Pieced for Work in Progress Wednesday.  What are you working on?


Friday, November 8, 2013

Happy Dance!!!!!!!

Blogger’s Quilt Festival :: Fall 2013

I am dancing a happy dance!  I found out today that my quilt, It Looks Like My Garden won in the Blogger's Quilt Festival Bed Quilt Category!!!!!!


Oh my goodnes!  Thank you so much to Amy for hosting and for everyone that voted for my quilt.   Yippee!

Tuesday, November 5, 2013

Quilting, quilting, quilting....


I spent a lot of time quilting my Marcelle Medallion on the weekend.  I was trying to do something a little more than just the basics.  So we have some stipples, some fans, some back and forths as well as some straight line quilting.  By then end of it, my hands were hurting and I had a stiff neck.  But it was done!  And since this was really the first time I did a combination of quilting styles, I learned a lot!

Binding comes next!

I also finished a project for a swap but that will remain a tight secret!

And I made Christmas Cakes.  You know, the English style fruit cakes loaded with candied fruit and soaked liberally with brandy.  This was the before picture and the after picture did not happen.  It made a vast quantity of batter and I abandoned the wooden spoon and just messed it all up with my hands.  Yum!  4 lovely Christmas cakes are now contemplating life wrapped up in booze soaked cheesecloth.  Linking up with Lee for Work in Progress Wednesday and the Needle and Thread Network!

Sunday, November 3, 2013

On the design wall...


I like to get my Lucky Stars Block of the Month done as soon as I find it in my email.  Seriously.  I need help.  So there it is.  This one was a bit tricky in that it had different components that all went together.  It worked really well so that was a good thing.  Having all your fabric pre-cut makes a huge difference.  If I was to do this one again, I would not use such a dark grey but that is okay.  I have also signed up for the Lucky Stars BOM for next year as well.  I need an intervention.

Here they are altogether so far.  Not too shabby!  Linking up with Judy's Design Wall Monday.