Sunday, November 8, 2015

Kona Club Challenge August Bundle


I put this tutorial together for Sew Sisters for their Kona Club Challenge. last month.  There are some great projects for other Kona solids projects on the Sew Sisters blog and this tutorial is also found there.

And Sew Sisters has an awesome deal of the month for November, Kona Basics, Ash, Black, Charcoal, White and Snow are only $7.69 a metre.  Just saying.


I decided to make something a little different for this project.  It would make a great gift for someone else but it might also be something you might like to make for yourself!


Supplies:

  • 4 FQs of Kona Solids ( I used Cornflower, Daffodil, Grapemist, and Windsor)
  • 1 FQ of Kona Solids OPTIONAL (this is for the lining and I used Kona Snow)
  • Scrap piece of batting measuring 14" by 23" at least
  • 1-3 ring binder 1" (I used an inexpensive Hilroy binder measuring 11.75" by 21.5" when open and lying flat.  The spine measured 1.5")
All seams are 1/4"

Cutting Instructions:
Decide which Kona FQ will be your feature colour for the outside binder cover and cut
2-8 x 13.5"main cover
From the 3 remaining FQs cut
2-8 x 13.5" inside flaps
2-8 x 13.5" inside flap lining
2-6.75" x 8" inside flap pockets
10-2" x 8" spine pieces assorted colours
2-2.5" x 8" inside pocket top edge from a colour which contrasts from the pocket


 Sewing Instructions:

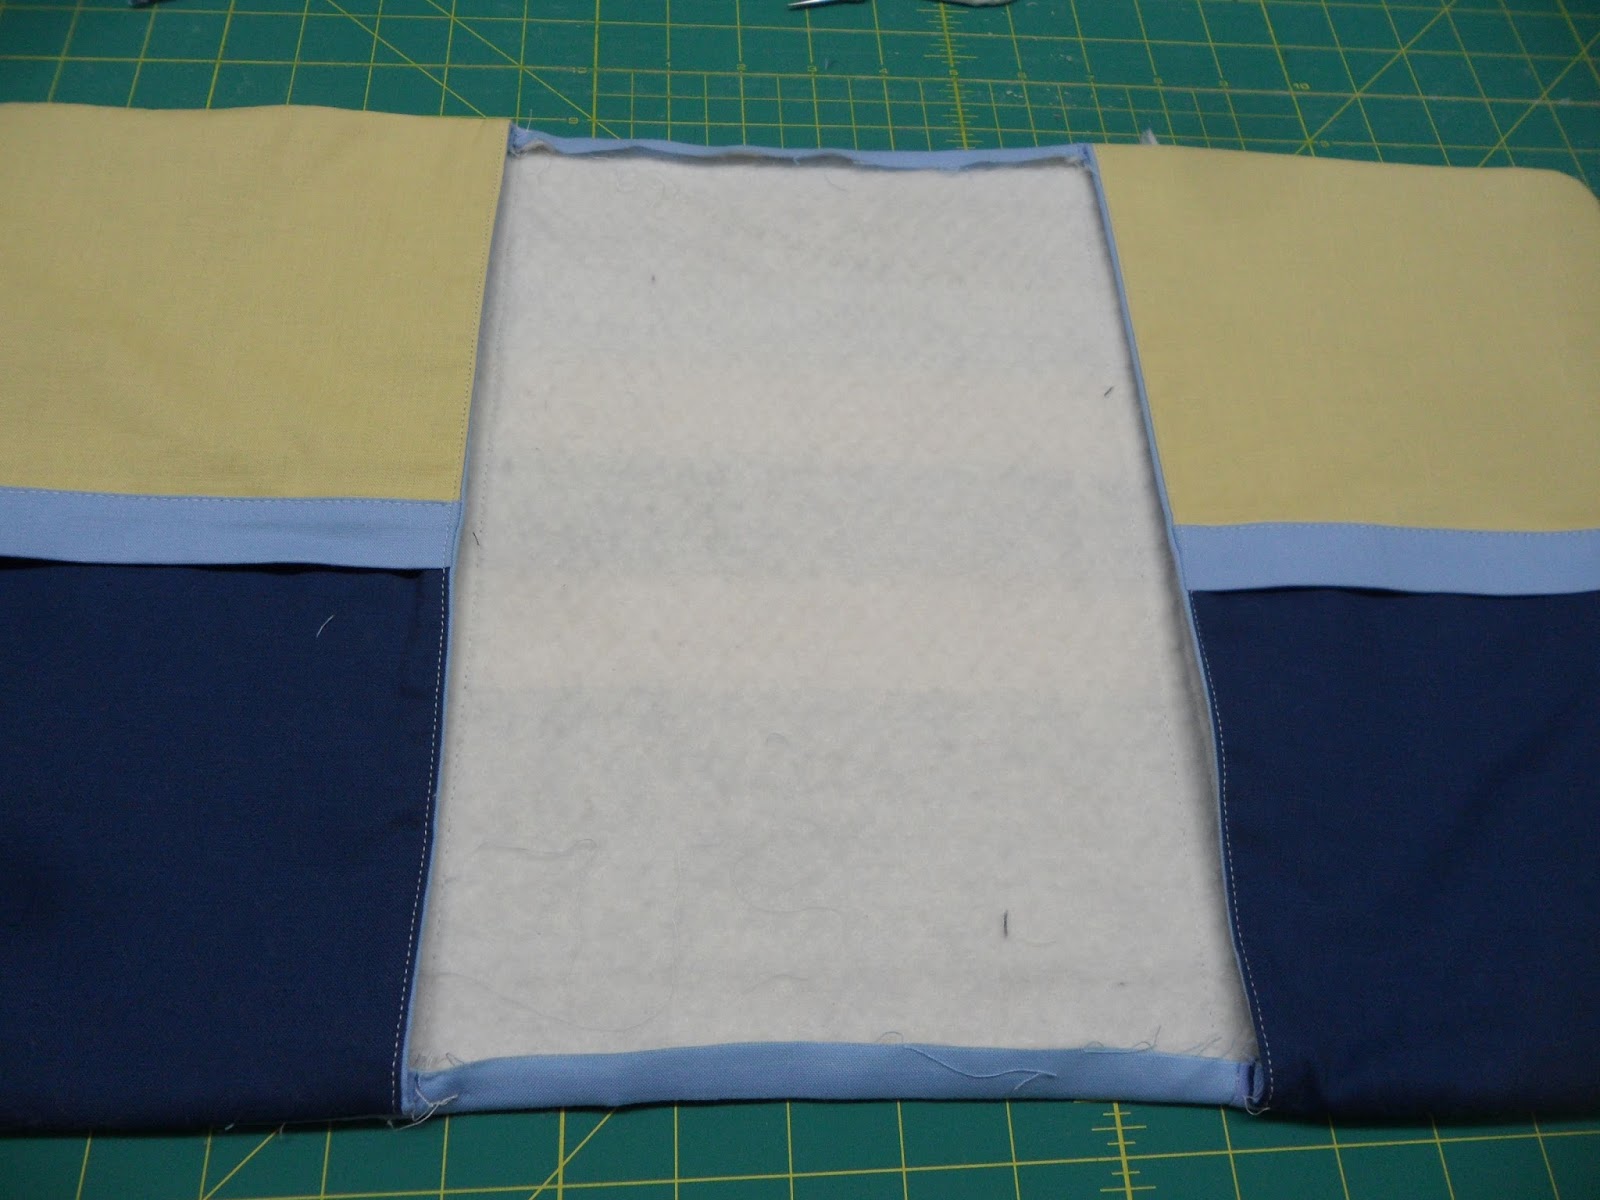
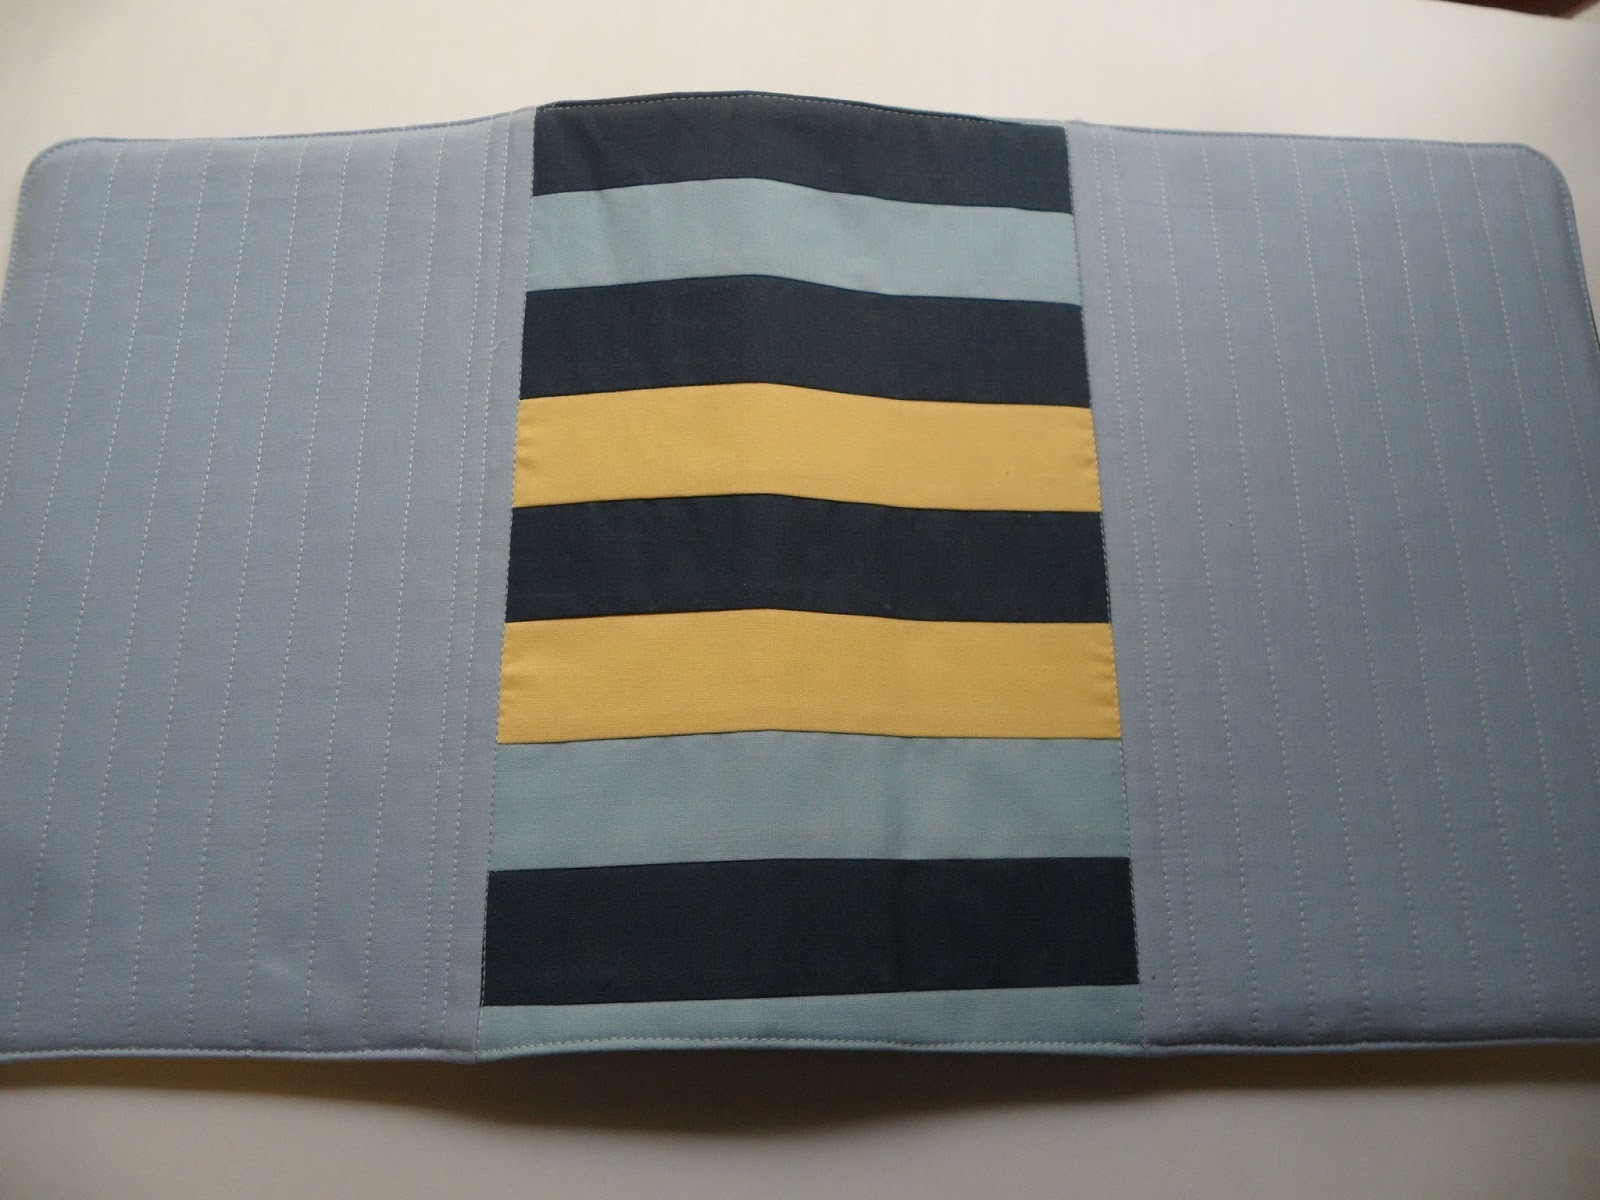
Arrange the pieces for the binder spine in a pleasing order and stitch together.  Press the seams to one side.  Centre the spine section to the front cover pieces and stitch as shown in the photo.  Trim the top edge of the spine section.  Place the outside binder cover on your batting, baste as desired and quilt as desired. I like straight lines and lots of them!


 Press down 1/4" the long side of the pocket top edge.  Stitch pocket top edge to pocket. Press seam towards pocket top edge.

 Press pocket top edge towards the pocket, covering the seam.  Top stitch close to the edge, encasing the seam. Repeat for second pocket.

Layer your flap pieces in this order.  Inside flap, pocket, inside flap lining and finally batting scrap measuring 8" x 13.5".

Stitch flap to flap lining, making sure you have inside flaps which are mirror images of each other as in the picture below.  Trim batting from seam allowances, press and top stitch edge.  Nice!


Stitch flaps to main binder cover.  Again, trim excess batting from seam allowance and press.  At this point test the fit of your binder in your cover.  You want there to be some looseness as the top stitching at the end will also reduce the amount of wiggle room. Trim your binder cover to measure 12.5".


 With right sides together, stitch top and bottom edge of flaps to outside binder cover.  Trim batting from seam allowance.  Trace the rounded corners of the binder on all 4 corners and stitch a curved corners.  Trim seams and turn to right side.  Press carefully.  At this point, you may wish to place lining on the inside of the binder cover.  Slip stitch to top and bottom inside binder encasing upper and lower bottom edge.  This is completely optional.  Otherwise, press spine of binder top and bottom edge to the inside.  Top stitch carefully around the entire outside of the binder cover.  I added a second row of stitching to secure the seam at spine edges.


 And there it is!  A lovely covered binder to store all your patterns and notes in and some lovely leftover scraps too!


Sunday, November 1, 2015

My Hillside Houses

     Name: My Hillside Houses
Size:  60" by 75"
Fabric: Solids, mostly Kona
Quilted: by me with Aurifil 50 wt in Dove grey, organic waves
Binding:   Kona Berry
Backing:  Shantytown by Kaffe Fasset and some other cobblestone like fabric from the stash


 I was inspired to make this fun quilt when I say Carla's version on her blog this past summer.  And I loved the fabric she used on the back as well.  I have to say, I was a total copycat and used the same fabric on the back and I used lots of purple too. Yep.  Confessions are good for the soul.    I have not been to Newfoundland but Husband has and that is what he thought of when he saw Carla's version.  So... here is mine. This was so much fun to put together.  The hardest part was deciding which colours to use!  I made a big mess of my solids.  A design wall was a must as the blocks have parts of several houses so you have to think ahead about your colour choices. The pattern is a free one that you can download from Craftsy.  The link to the pattern can be found here.   And the pattern has 3 sizes.  This is biggie sized.


I quilted it yesterday in wavy curves that vary in both amplitude and frequency as per Husband's advice.. It was free range walking foot action.  It was a bit of a wrist and arm work out. I looked at a bunch of finished Hillside Houses to see how other people had quilted the pattern and Husband and I thought the waves worked. Let's just say it is the wind. I used Aurifil 50 wt in Dove which worked wonderfully with all the solids. I increased the stitch length to 3.2 because of all the curve action.  I am always surprised but the difference quilting makes in the texture of a quilt.  Somehow that never gets old!  I used Kona Berry for the binding.  It worked perfectly!  I am so pleased with this one.


Sunday, October 25, 2015

Blogger's Quilt Festival: My Scrappy Entry


    Name: Grape Juice
Size:  64" by 80"
Fabric: Purple, bright pink and low volume scraps 
Quilted: by me with Aurifil 50 wt in Dove grey, straight lines
Binding:   Kona Eggplant
Backing:  an awesome vintage sheet in purple

Hello!  If you are popping over from the Blogger's Quilt Festival, welcome!  I decided to enter this quilt, Grape Juice, in the festival, scrappy category, this year.  Oh my.  I do love this quilt but there were times that I had to walk away. Even my husband told me to leave it alone and come back to it later. He reminded me that quilting is supposed to be fun.  And it wasn't fun at that moment, let me tell ya! I won't give the whole long story but if you want to read the whole story about how I realized after finishing the quilt completely.  Completely.  That several blocks in the bottom row had been placed incorrectly, throwing off the pattern.  Argh.  Anyway, it is all fixed and lovely in purple scrappy-ness.

If anyone is interested in the pattern, it is a free tutorial by Liz Katsuro.  I made the quilt with a huge variety of scraps all in a similar colour palette as well as a bunch of low volume scraps and bits and pieces.  To add to the scrappy vibe, I backed the quilt with a fabulous vintage sheet.  I am pretty sure that I picked this one up at a thrift shop a few years ago but it might have come from one of my aunts.  Wherever I got it, it was the perfect back and was a good heavy 100% cotton sheet. Nice! I  quilted this in Aurifil 50 wt in gray, with lots and lots of straight lines to give it texture.

So there it is.  Grape Juice.  Scrappy.  And with a story of frustration, persistence and satisfaction at making it right.  Entering this in the Scrappy Category of Amy's Blogger's Quilt Festival.


Monday, October 19, 2015

Schnitzel and Boo Mini Quilt Swap

    Name: Just a little x block
Size:  19.5" by 19.5"
Fabric: Selection of prints from Bonnie and Camille, Bliss and Ruby, Cotton and Steel Hatbox lines, Kona White
Quilted: by me with Aurifil 50 wt in white, straight lines
Binding:   Kona white
Backing:  an awesome Sewing Studio print by Cynthia Frenette for Robert Kaufman 

I finished this little quilt last weekend.  I hung it on the barn wall in the misty rain and took a few quick pictures. This if for the Schnitzel and Boo Mini Quilt Swap on Instagram and after debating endlessly about what to do, I made 16 wee x blocks.  Each finishing at just a smidge under 4".  I used a variety of Cotton and Steel prints and some Bonnie and Camille prints from both Ruby and Bliss.  The Bonnie and Camille prints have been lingering far too long in the great wall of fabric so it felt good to use them.  I used Kona White as the background and binding and then did lots of straight line quilting in Aurifil 50 wt in white..  So much fun!

The backing is from my buddy Cynthia's line, Sewing Studio.  It seemed perfectly appropriate for a swap!  I also used one of Cynthia's labels on the back.  You can pop over to her Spoonflower shop to see all sorts of lovelies!

And now I just need to get it all wrapped up and off to the mail!


Saturday, October 17, 2015

I do love zippy pouches


I made this zippy pouch last Monday. So much fun.  Mum was down for Thanksgiving and she watched me make it.  I think it took about 25 minutes start to finish.  How awesome is that?  A little bit of quilting with some Aurifil 50 wt in white and some Cotton and Steel fabrics,  Yum.  I made this to put the little extra treats in for the Schnitzel and Boo Mini Quilt swap.  And I do hope my partner likes it.  After all, happiness is a new zippy pouch on a sunny fall day!


Monday, October 12, 2015

A finish: Prospector's 16 Patch


   Name: Prospector's16 Patch
Design: St. Louis 16 Patch (tutorial at Sew with Sass)
Size: 56" by 72"
Quilted: by me with Aurifil 50 wt in cream on either side of each square
Backed with a vintage sheet

I made this St, Louis 16 Patch with the intention that it be a donation quilt for the Rock Creek Forest Fire victims, I put it together with a vision of who it might be for but then the organizers of the quilt drive said they only wanted queen size quilts.  Wah wa wa.  Darn.  This is not a queen size quilt.  It is a long twin.  And I made it that  because I thought it might be good for an older gentleman, perhaps even a prospector type who may have lost his cabin in the wild fires.  In my mind, it was a good idea.  I used to teach in that area, years ago and we lived in the little town of Midway when the kids were young.  So my idea was not that out of whack.  Since the quilt was not wanted, I have it in a pile waiting and will jump at an opportunity to donate it, especially to an older gentleman, who may have a cabin and may or may not be a prospector type.  Or something.

Made with a variety of prints from my stash and with mostly low volume prints making up the 16 patch squares, this quilt comes together in a hurry.  The tutorial is a good one.  The quilt is quilted simply, a quarter inch from the seam lines on one side of each quarter inch block in Aurifil 50 wt in cream.  

Happy Canadian Thanksgiving!


Sunday, October 4, 2015

Schnitzel and Boo work in progress


I joined the Schnitzel and Boo Mini Quilt swap on Instagram.  I have been waffling and waffling but I had to get started.  I knew what fabric to use as my partner was pretty clear on that but I was not sure what to do.  I have not been in a mini quilt swap before and for some reason I was paralyzed with indecision.  Today, after a bunch of other sewing, I started making little itty bitty x blocks.  They take me to my happy place.  I need about 16 of them.  The blocks measure about 4" finished.  Cutey patootey.  Happy October, people.  Roses still blooming and the veggie garden is still producing.  What a year in weather!