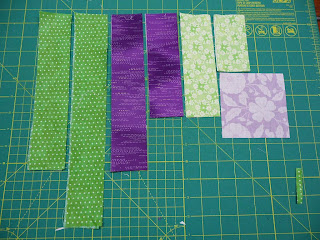
I thought it might be fun to have a really, really basic quilt block tutorial for "The Wedding Quilt." I can now say that this worked really, really well for the bride and groom. Many blocks were made by beginning or non-quilty people and it all turned out great! Tomorrow, I am going to post some great extreme quilting photos of how non-quilty people tackled this! Those photos are inspiring!!!!
Quilt
blocks:
Some
Basic Quilt Construction Info for Non-Quilters or Beginning Quilters:
11) In order for the quilt blocks to finish at
roughly the same size, it is important that you try to have as close to a
quarter inch seam as possible on all of the seams in the quilt block. A quarter inch seam is roughly a little less
than your basic pressure foot on your sewing machine. Try a small seam, measure it to see, and
try your best to get a quarter inch seam.
You can do it!
2) When
cutting the strips for the block, be as careful as you can with the
measurements of the pieces. You may wish
to make a paper pattern to use if you do not have quilting tools (a rotary
cutter, cutting mat and ruler) and are planning to use good old fashioned
scissors.
3) The
fabric should be cut on straight of the grain.
Materials: You will need a selection of 100% cotton quilting cotton. You may
choose to use 2 shades of one and 2 shades of another or may simplify the
fabric choices with only 1 of each.
It is up to you how complicated you wish to make the block. These sample colours are just samples. Feel free to choose colours that are in these
colour families but exact matches are not needed. : )
Have fun when picking your colours and they can be prints. They do not need to be solids. Prints are often more fun. For instance, we chose purple and green. You could also pick just purples or just
greens. Your choice.
You
may select quilter’s Fat Quarters when buying the fabric or by yardage. You would buy 4 fat quarters if going that
route. 2 fat quarters should do the
trick if you are just using 2 colours.
If you are buying yardage, you will need no more than a 10 cm cut of
each fabric if using 4 colours. 20 cm of
each colour if using 2 colours.
Use a good
quality thread.
Cut
your pieces carefully. You do not have
to prewash your fabric.
Supply list:
Thread
10 cm of colour a, b,
c and d or 4 fat quarters in your colour choices.
Cutting
Instructions:
You
will need:
1.
Cut one of
4” x 4” for the centre square
Colour A
2.
Cut
2 of 2” x 4” strip Colour B
3.
Cut
2 of 2” x 7” strip Colour B
4.
Cut
2 of 2” x 7” strip Colour C
5.
Cut
2 of 2” x 10” strip Colour C
6.
Cut
2 of 2” x 10” strip Colour D
7.
Cut
2 of 2” x 13’ strip Colour D
Construction:
Take
your 4" square and pin a 4" strip on each of 2 sides of the square. Right sides together. Stitch a quarter inch seam on each side. Important:
Press open all seams.
Take
the 7” strips and pin them in place, right sides together and sew a quarter
inch seam, enclosing the lavender square.
Press seams open.
Now
take the 7” strips in colour C and pin them to the square, right sides together
and sew with a quarter inch seam. Press
seams open. You are well on your way
Take
the 10” strips of the same colour and pin, sew and press.
You
are almost there! Take the final strips
and pin the 10” strip to the block, pin, sew, and press. Finally take the 13” strips and pin, sew and
press. Voila! Your quilt block is done!
Your
block should finish at close to 13” square.


Cathy, just met you tonight at the FVMQG, as a new quilter this looks just right up my alley. I will be doing this block next. Thanks very much. Newbee Debbie
ReplyDelete